

If you want something done right, you might have to do it yourself. While there are many WordPress themes available, finding one that has the exact look and functionality you need could be difficult. In fact, you might be tempted to create your own theme instead. Getting started with theme development can seem overwhelming, especially for a beginner.
Creating WordPress themes can be really simple if you know basic HTML, CSS, and JavaScript. However, if you are new to WordPress, all you have to do is follow the tutorial steps for beginners. By the end of this tutorial, you’ll learn how to make a WordPress theme, have a better grasp of how everything fits together, and how to use WordPress at your leisure.
What are the Requirements to Create a WordPress Theme?
First and foremost, you need to install WordPress. You can follow our guide here if you don’t know how to install WordPress. You can also get WordPress from the official website, but you’ll need to change the database credentials first.
You don’t need to know any PHP or have any prior WordPress knowledge. But a development environment with Apache, PHP, MySQL, and WordPress installed is required to design a WordPress theme. You must also understand the theme’s structure. In its simplest form, a WordPress theme is a regular HTML page that is made up of the following files:
- header.php – contains the code for the header section of the theme.
- index.php – contains the code for the Main Area and will specify where the other files will be included. This is the main file of the theme.
- sidebar.php – contains the information about the sidebar.
- footer.php – handles the footer section.
- style.css – responsible for the styling of your theme.
- single.php – includes code for displaying the article on its own page;
- page.php – includes code for displaying a single page’s content;
- archive.php – displays a list of items in the archive, as well as the categories that the user has defined;
- functions.php – This file contains functions that enhance theme functionality, such as logos, menus, color, thumbnails, scripts, and stylesheets.
- 404.php – an error code indicating that the requested file could not be found.
Now let’s move on to the steps for creating a WordPress theme.
Step 1: Make a folder to hold the files you’ll be adding
Outside of configuring WordPress, almost everything you do in WordPress will be in the wp-content folder; everything else is core code, and you don’t want to mess with that. Anyhow, we need to know where the files that make up a WordPress theme sit in a WordPress installation if we’re going to construct themes. A WordPress installation usually contains a WordPress directory as its root directory. Take a look at how the root directory appears.
Files:
- index.php
- license.txt
- readme.html
- wp-activate.php
- wp-blog-header.php
- wp-comments-post.php
- wp-config.php
- wp-config-sample.php
- wp-cron.php
- wp-links-opml.php
- wp-load.php
- wp-login.php
- wp-mail.php
- wp-settings.php
- wp-signup.php
- wp-trackback.php
- xmlrpc.php
Folders
- wp-admin
- wp-content
- wp-includes
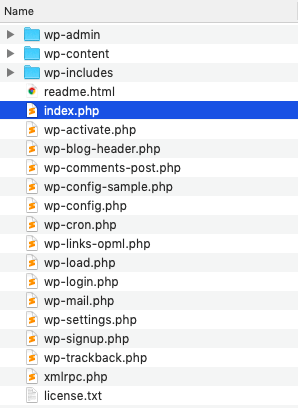
In Finder, follow the path of wp-content > themes to arrive at your themes folder. You’ll see the WordPress default themes – twentynineteen, twentytwenty, twentytwentyone – and index.php. Create a new directory for your theme.
Step 2: Create the Custom Theme
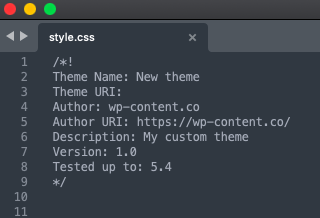
A WordPress theme needs only two files to exist – style.css and index.php. Therefore, you must additionally create two necessary files index.php and style.css when you finish constructing your theme folder. Style.css simply contains a comment that alerts WordPress that a theme exists here. It is required in all themes and contains the information header for your theme. Change the name, author, description, and so on. Let’s take a look at what each of them indicates.
Theme Name – A theme name should always be provided. If you don’t, the folder name will be used.
Theme URI – it should direct users to a website where they may learn more about the theme.
Author – This is where you put your name.
Author URI – Here you may add a link to your personal or business website.
Description – is displayed in both the wp-admin theme modal and the WordPress theme listing.
Version – Version numbers help developers keep track of changes and ensure that customers use the most up-to-date version.
License – You may choose how your theme is licensed, but if it isn’t GPL-compatible, you won’t be able to distribute it on WordPress.
There are few more fields to style.css but none of these fields are technically essential. However, they are strongly recommended if you want your theme to appear decent in wp-admin. Below we have just assigned a Theme Name, Author, Author URI, Description, Version number and Tested up to (The last main WordPress version the theme has been tested up to) to our theme in the example.
Coming to index.php WP loads the posts that would be shown on the screen using this file. It is the main template file and is required in all themes. In addition, if a WP base file is missing, wp will use it. Your theme has now been created. Go to the WordPress dashboard, and click on Appearance > Themes. You’ll see the theme in the collection with all the default themes.
Step 3: Activate the Theme
As mentioned above, go to the WordPress Dashboard, choose “Appearance,” then “Themes,” and see if the newly built theme is listed there. To check if the information entered in the style is correct, go to “Theme Details.” Then, activate the theme and go back to your main URL. With this, you’ve technically created a custom theme already. Of course, it doesn’t do anything yet beyond what a static HTML site can do, but you’re all set up now.
Step 4: Change the Settings in the index.php file
To test if your theme works, go back to the index.php and write a command-line for WP to retrieve from the database the posts and show them on the page. You must restore the post’s title and content so that all of the files can be seen on the home page.
The “have posts” command instructs WP to look for blog posts in the database. The page will be updated if there are any new listings. If not, the message for the negative response condition that we set in the code will be shown (false).
There is a function named “the post” that must be added to the loop “have posts” in order for WP to show that file whenever the “have posts” condition is true. WordPress looks for new entries in this loop and shows them on the page as needed.
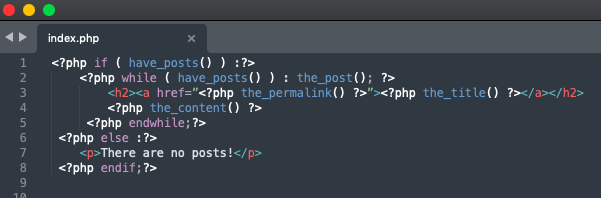
The “the post” method fetches the most recent post and makes the required adjustments to show it chronologically on the theme page. Because this is a loop, if the function returns true, every time a new post is made, it will be instantly included.
The content is attached to the file title put on the page using the “the content” function. The “the permalink” function creates a link to each individual post, allowing users to view the information without having to scroll through the entire text on the main page. You can use “the excerpt” method instead of the “the content” method to add a quick summary under the file title with the first 200 characters of the content. As a result, when the user clicks on the link, they only get the whole text.
Step 5: Dividing Your Page into Sections
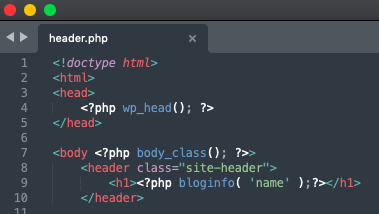
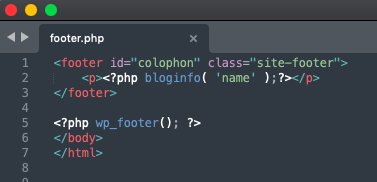
Presently, everything is in index.php. But obviously, we want the header, footer and sidebar on all the pages to be the same. So, we’re going to divide index.php into two sections – header.php and footer.php.
It’s good to have wp head in all of your themes since it’s a particular function that wraps up the output in the header.php file’s head> section. It should be entered before the closing /head> tag to make it smoother to add plugins to the site, since this hook may be used to integrate styles, scripts, or meta components to the head> region. Whereas, the footer.php file can close the tags used in the functions, as defined below:
Most websites, especially blogs, will also have a side area for including content such as archives, tags, categories, ads, and whatnot. If you want them, you need to again divide the index.php into sidebar.php, content.php, etc. If the sidebar is where all the secondary information goes, the content is where all the articles and main content of the website go.
Also read: Fastest WordPress Themes
Step 6: Create the functions.php file
Now, your custom theme contains index.php, style.css, header.php, and footer.php files. The next file you should have is functions.php, which gives WordPress personality by allowing the command-line to change the CMS’s default behaviour. It does not require a unique header text. It only works when the theme is active and applies only to the current theme.
Conclusion
This article was all about learning the fundamentals of creating a WordPress theme. There is much more to learn about WordPress. We sincerely hope this article opened a world of possibilities to you. Now you know that any website can be converted into a WordPress theme – without using plugins, widgets, or someone else’s theme.
so perfect and explained beautifully
Thanks for the kind words 🙂
Where I have to put my Index.html file, other forms.html file, say contactus.html, it will utilise incoming email, how to configure and which WP’s Php file needs to attach, NewUser.html form, which php file needs to be attache, where this file have to keep
Please note that, as mentioned in the guide, you need to create the index.php file, which is the main file of the theme. If you add the code that we have provided in the index.php file, then after activating the theme, when you view any post/page, it will show a page with the post title and its content (content from the editor). According to your index.html file structure, you can customize the index.php template file. But please note that the important part of any template is the ‘The Loop’. What content goes outside or inside it can be customized according to your need.
Other pages you have mentioned can be created using page templates. Page templates generally have a high level of specificity when compared to the main template file, index.php. So basically, you can convert other HTML files to page templates by creating specific pages for these. The important part you have to remember is the page slug. The template file should contain the right slug so that WordPress can load the right page for you. For example, a page template named page-contactus.php will be loaded by WordPress when you view a page with the slug of “contactus.” This page won’t load the index.php file. Also, you can use page templates multiple times by specifying a template name. Basically, you need to write an opening PHP comment at the top of the file that states the template’s name.
<?php /* Template Name: Example Template */ ?>
These are some of the advanced concepts, which we may cover in a separate guide.
Hope this helps!
so perfectly explained
I have read your blog on creating a Custom WordPress Website.It was very interesting and helpful but I can add some extra points in your article. Here some extra points:
1.Select a WordPress plan.
2.Set up your domain name and hosting provider.
3.Install WordPress.
4.Choose your theme.
5.Add posts and pages to your website.
These are some extra points to add to your article. Readers if you are confused about your web and App development , you can get a free consultation at Alakmalak technologies.Visit our site for more information.
I went through your article which was on wordpress theme. I would like to add some easy points which are as follows.
1.Backup Your Site
2.Choose a Theme
3.Access the Customizer
4.Site Identity
5.Colors and Typography
6.Header and Footer
7.Menus
8.Widgets
These are some of the points which I wanted to include in your article. Readers, If you want to create your wordpress theme, you can visit an IT company like Alakmalak technologies. They have 17+ years of experience in this field.