


The antidote to limiting the downtime your WordPress website experiences is to know your way around the possible scenarios that can lead to such a situation. Yes, as you have guessed, many factors can affect your website’s uptime, and the more knowledge you arm yourself with, the faster you can react.
One such factor that can cause all sorts of problems is the memory limit exhausted error. From slowing down your WordPress website to preventing you from completing actions to occasional downtime.
Here we will explore and understand what the memory limit in WordPress means, why it is there in the first place, and the multiple ways by which you can increase WordPress memory limit.
What Exactly is the WordPress Memory Limit?
PHP is one of the underlying foundations on which WordPress is built. Not just WordPress but all the plugins and themes also utilize PHP. Now the problem is everything from WordPress to all the plugins, scripts, media files, and so on needs memory to run.
The memory that is required is drawn from the hosting server. How much memory is available will depend on your hosting plan. The users who have opted for shared WordPress hosting will also have a lower amount of RAM compared to managed WordPress hosting.
But with so many individual parts, there needs to be a form of restraint on how much memory each PHP script can consume. This is where the WordPress memory limit is handy. For example, If you set the limit as 60MB, each PHP script can use 60MB of memory and nothing more. But now, the question that will be lingering in your mind would be:
“Why not allow the PHP scripts to use all the available memory and why put a restrain on it? The more memory they can use, the better the performance right?”
Well, the answer would be No. If the scripts are allowed to take up all the server memory that is allocated by your hosting plan, it can lead to a slow website and cause downtime. The server does require a certain amount of RAM to itself to make sure everything works properly. If the entire memory is used up, the server will go offline.
The default memory limit for a single site is 40MB and for a multisite is 64MB. This can be a cause for concern as your website grows. With more scripts, plugins, and media files, you will eventually face the memory limit issue warning and it will be like this:
Fatal error: Allowed memory size of xxxxx bytes exhausted.
Now in WordPress, you will see two memory limit options:
- WP_MEMORY_LIMIT
- WP_MAX_MEMORY_LIMIT
What we are interested in now is the first one. The WP_MEMORY_LIMIT determines the memory for the frontend and WP_MAX_MEMORY_LIMIT determines the backend memory.
The memory limit in WordPress is an excellent way to let website owners know that something in the background is consuming more memory than it should. Most often issues are caused by plugins and themes that are poorly coded or contain malicious scripts within them.
But at the same time, the memory limit can also be a blocker when you try to install a genuine plugin, theme, or upload media that needs more memory than what is available. Because you won’t be able to complete the task due to memory restriction. In such situations, knowing how to increase the WordPress memory limit will be beneficial.
In short, the memory limit is in place to make sure that the server that is hosting your WordPress website doesn’t get stressed to the point where it causes downtime to your website. The goal is to have enough memory for your WordPress website as well as to keep the server up and running.
Also read: How to Backup a WordPress Website?
How to Check Your Current WordPress Memory Limit
Checking your current WordPress memory limit is a simple task. In order to check the current limit, from the dashboard access Tools> Site Health:
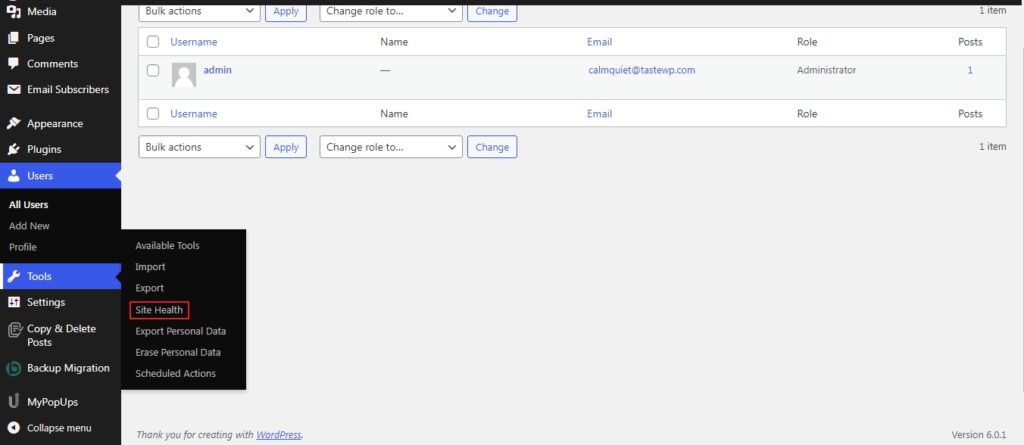
Once on the site health menu, choose Info and select WordPress consonants:

What is the Maximum WordPress Memory Limit?
More the memory, the less the problem. Right? Well, the answer is No. If you allocate too much memory, then you are only making it worse. When there is too much memory available, the rouge script can take up all the resources and bring down the server. Most WordPress websites will be good with a memory limit of 128MB.
If not, the maximum you will need will be 256MB. This would be good enough to cover everything and make sure everything runs properly. You can raise it to more than this, but the maximum should be 512MB. This will cover almost all power-intensive needs that you will come across.
Also read: How To Fix the 500 Internal Server Error in WordPress
Top Reasons for WordPress Memory Limit Exhaustion
The memory limit error is a big cause of concern. Mainly because it is capable of affecting the entire website and rendering you from completing an action. With the website down, you lose a lot of visitors which can also negatively affect the SERP rankings. So finding the root cause and solving the issue is of utmost importance.
The most common factors of WordPress PHP memory limit exhaustion are:
1. Unoptimized Plugins
The number one cause for this error is unoptimized plugins. The point to note here is that the plugin as a whole won’t be problematic. It may be a script that has gone rogue demanding more resources. Unless the developers have made it clear that this particular plugin needs more memory, it is most often a bad PHP script.
If the memory limit is caused by a plugin or more than one plugin, troubleshooting is easy. All you have to do is, deactivate all the plugins and activate them one by one. Then see which plugin throws the error.
2. Themes that are a bit heavy
Some themes do require a bit more memory to run than the rest. It all depends on the scripting and the features it comes loaded with. The more the script and the features, the more memory it requires. In such cases, when you try to install a new theme, the result will be the memory limit exhausted screen, as WordPress is unable to complete the action with the current memory settings.
3. Your website is growing
The more time you are active online, the more growth you will see. This growth can be seen in your content as well as your database. As more and more content is added, such as images and videos, the memory needed to run all of them has to be increased. The same applies to your database.
Also read: How to Fix “Error Establishing a Database Connection” in WordPress
The Top Ways to Increase the WordPress Memory Limit
Now that we have covered what WordPress memory limit is and why it is implemented, it is time to learn how to increase it.
There are 4 ways to increase the WordPress memory limit:
- By editing the wp-config.php file
- By editing the php.ini file
- By editing the .htaccess file
- Choose a better hosting plan
1. Increase the PHP Memory limit through the wp-config.php file
The first way to increase the WordPress memory limit is through the wp-config.php file. This is a simple task. All you have to do is to find a line of code, insert the desired value and save the file.
Firstly access the wp-config file through an FTP file manager. Once accessed, open the wp-config file and look for the line define( 'WP_MEMORY_LIMIT', 'xxM' ); .If by chance you don’t find the line, add this line above “That’s all, stop editing! Happy blogging.”
The “xx” stands for the value you should insert.
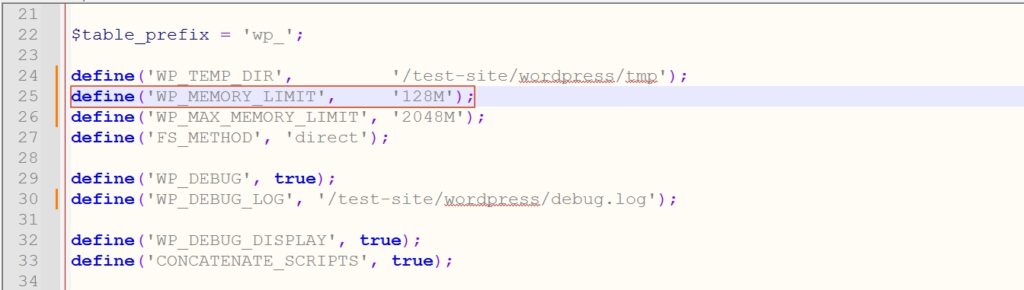
Once you have found this line, enter the desired value. A value of either 128MB or 256MB would suffice. After changing the value save the file and close the FTP manager and you are done.
2. Increase the memory limit from the PHP.ini file
Sometimes editing the wp-config.php file may not solve your problem. In such cases, we can edit the php.ini file to increase the WordPress memory limit and see if it fixes the issue. If you have access to the file, this will be located in the root folder. The php.ini file controls the server’s settings.
Open the php.ini file and look for “ memory_limit = xxM”
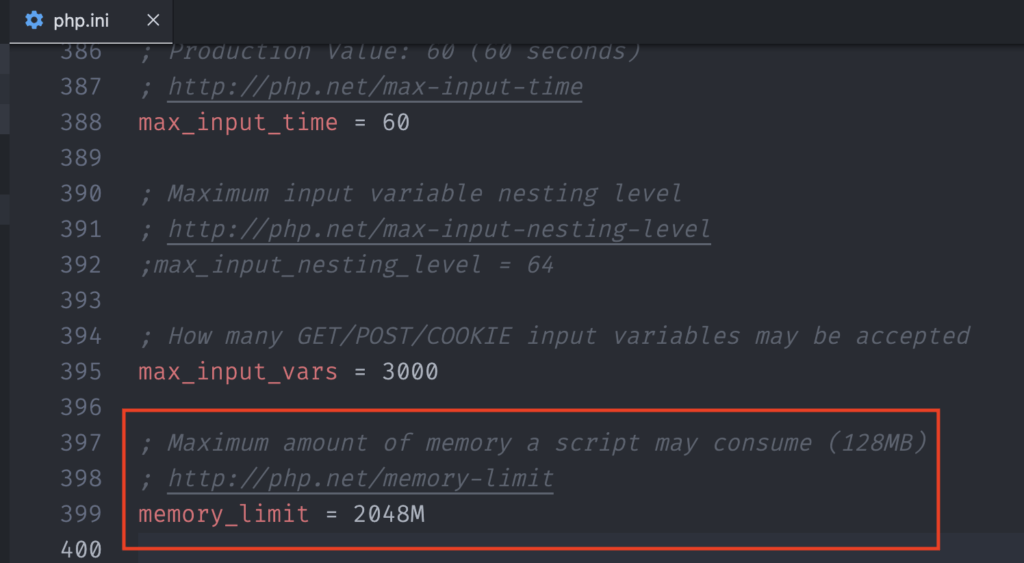
Enter the new value and save the file. Hopefully, this would fix the memory issue and get everything up and running smoothly.
One thing to note is that, if you are on a shared hosting plan, you will not be able to edit this file.
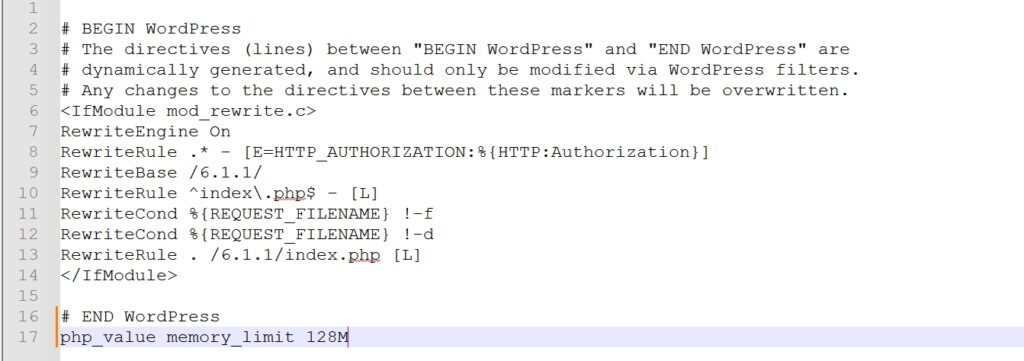
3. Increase the PHP memory limit from the .htaccess file
Another way to increase the WordPress memory limit is by editing the .htaccess file. If all the above else fails, this can be your last resort to fix the memory issue all by yourself.
Use an FTP file manager and locate the .htaccess file. If you do not see the file, the root cause is that it is hidden. Turn on the view all hidden files option in the FTP manager and you will see the .htaccess file. You can find this file in the root folder.
Open the file and look for the line #END WordPress and the following line below it
php_value memory_limit xxM
4. Opt for a better WordPress hosting plan
As we have mentioned already, how much memory is available to you is tied to your hosting plan. If you have opted for a low-memory hosting plan, then simply increasing the memory limit won’t solve your issue. As the available memory provided by the hosting plan won’t meet the requirements.
Hence the option would be to upgrade your hosting plan to a much better one and then increase the memory limit to fix the issue.
Also read: The Loop in WordPress Explained – Beginner’s Guide
Wrapping Up
The memory limit error in WordPress is easy to fix now that you know what causes it and how to work your way around it. We have covered the WordPress memory limit, why it is there, and the different ways to increase it.