
WordPress is the most loved CMS for its flexibility and the vast array of plugins and themes it makes available to site owners. If you want to add a feature to your WordPress site, you will almost certainly find a plugin that does the job. But, at times, you may find yourself in situations where plugins suitable to your requirement are not available. The solution is to add a snippet of custom code to the site. In this article, we will show you 3 easy ways to add custom code to your WordPress website without breaking it.
But before we do that, let’s look at the things that you must keep in mind while adding custom code.
- Don’t directly edit code in WordPress core, plugin or theme files.
- Take backups before you modify anything. In fact, keep backing up your work throughout the process.
- If possible never use the parent theme’s functions.php – create a child theme.
Ways to add Custom Code to your WordPress websites
1. Use a Plugin
If you are not confident enough to tamper with the backend of WordPress, but would still like to make some custom code tweaks, your best option would be to use a plugin to insert code at strategic places on your site. Code Snippets plugin can help you in such a situation.
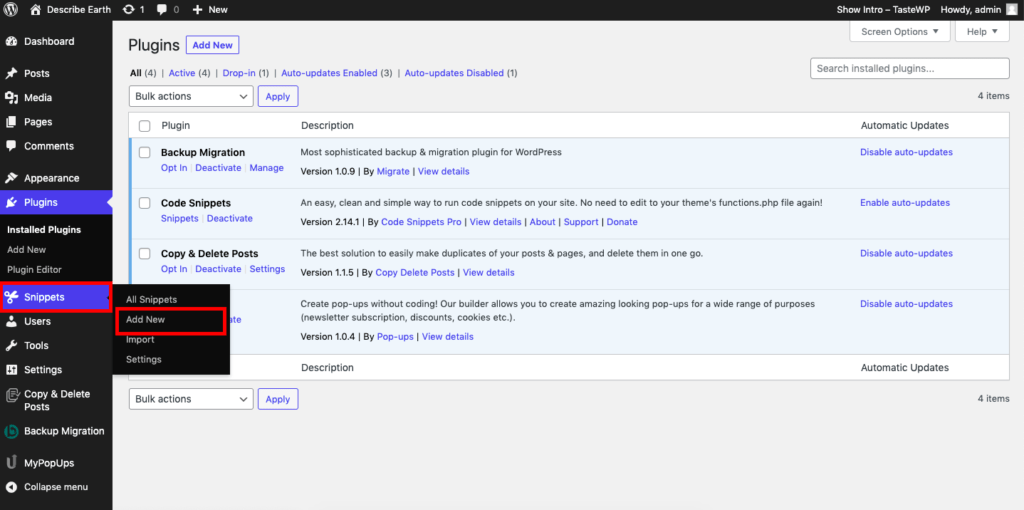
You can install the plugin from the repository and activate it. The plugin will create a new submenu in your dashboard called “Snippets” where you’ll be able to find all the functionalities of the plugin including the list of all the custom code snippets that you save on your site.
Now click on the Add New button to add your first custom code snippet in WordPress.
This will bring you to the ‘Add New Snippet’ page.
Enter a title for your custom code snippet (anything to help you identify the code later)
Then copy-paste your code snippet into the code box.
There is a text area below the code box to add a description of the code. To help you sort the code snippets by topic and functionality, you can assign tags to your code snippets.
You can also change the scope of the code snippet – you can run it only in the WordPress admin area, on the front-end of your site, only once or everywhere. If you are unsure, then it is better to select the default ‘Run snippet everywhere’ option.
Then click on the ‘Save Changes and Activate’ button to make it effective on your website immediately. Click on the ‘Save Changes’ button if you only want to save and not activate the code snippet.

The advantage of using the Code Snippets Plugin is that it automatically detects syntax errors in code and deactivates it. It also helps you to debug errors by showing helpful error messages. You can also enable and disable your code snippets just like plugins as well as export them into PHP files.
2. Build a Custom Plugin
Using a custom plugin is a great way to add code snippets, as you can keep these snippets around if you change themes. If you feel comfortable adding your own plugin, you can follow this method, but it’s a bit more difficult to do.
Very simple plugins will need a couple of components for use on your site. This is an easy way to add code in an organized fashion that you can update as needed. First, you’ll need to create a folder in <your-site-path>/wp-content/plugins/ and name it – this will be your plugin name.
Next, you’ll need a main file for your plugin. This will include the title of the plugin, a description, and some basic information. You can also add a line of code to deny external access to this plugin, and name it with .php file extension. Create this file using a text editor, such as NotePad, NotePad ++, Text Wrangler, or TextEdit.
In the file put this
Then add your custom code below this. Now put it in your plugin folder and compress it into a .zip file and upload it to your website. You can then use this for all custom code and update it as needed by deleting it and re-adding it, or overriding it via FTP.
You can also refer the WordPress Codex for more information on plugin development. You can also use a plugin called Pluginception to quickly and easily create new plugins.
3. Use a Child Theme
If you are unable to use the first two solutions mentioned above, you can try out this method. Child themes are used specifically for overriding some of the basic functionalities provided by a theme. Most basic and widely requirement of using a child theme is overriding or adding JavaScript or Styling using CSS.
If you’re using a theme that is built and supported by a third-party, it’s a good idea to use a child theme. Without a child theme, any code changes that you make will be overwritten the next time you update your theme. When you use a child theme you’ll be able to update the parent theme without losing the changes you’ve made in your child theme.
Creating a child theme when you want to modify your code will save you a lot of trouble. Just follow these steps to create a child theme within no time.
Step 1 – Create a folder in <your-site-path>/wp-content/themes/ and name it. It’s a usual practice to use the parent theme’s name followed by a -child suffix. For example, if you are using Twenty Twenty-One theme, you can name it twentytwentyone-child.
Step 2 – Create a stylesheet file named style.css inside the above folder. Your stylesheet must contain the below header comment at the very top of the file.
Step 3 – Theme Name and Template are required. Other information can be omitted or updated accordingly. The ‘Theme Name’ needs to be unique to your theme. The ‘Template’ contains the name of the parent theme directory.
Step 4 – Now, create a file named functions.php in the same folder, and copy and paste the code below to the blank file and save it.
Step 5 – Go to Appearance -> Theme from WordPress admin screen and activate the above theme.
Now the child theme is ready for you to customize.
You can learn more about the Child Themes from the WordPress Codex. The one drawback to child themes is the amount of research you have to do on the parent theme before you can modify it, without causing any conflicts or weird side effects. We still recommend the first method because it being hassle-free.
Also read: Fix for WordPress Not Sending Emails Issue
Conclusion
We hope you now have a better understanding of how to add custom code to your WordPress site and what method is best for your situation. The ability to add code to your WordPress website can help you fine-tune your website with everything from sweeping changes to small tweaks. Do get back to us with any queries and we shall be glad to help you out.