Giving life to a WordPress online store is one of the most practical ways to earn money online, and the malleability of the WordPress platform makes creating an online store a child’s play. So, if you are wondering about how to start an online store with WordPress and make some bonus money, you are in the right place. In this article, we will go over the topic wholeheartedly and cover every step of establishing your own online store and setting it up for success.
The first three steps of creating an online store are the same as creating a WordPress website. i.e. register a domain name, get a hosting provider and install WordPress. If you have no knowledge of these steps, we request you to go through our previous blog on how to create a WordPress website. While choosing a domain name, keep in mind that your domain name is how your customers find your website. So make it catchy and short as much as you can. Once you have completed these initial steps, you will get a WordPress website where you can customize and create your eCommerce website.
1. Select and install an eCommerce plugin
There are no inbuilt eCommerce features in WordPress, so to include this component to your website, you have to install eCommerce plugins. There are numerous plugins like WooCommerce, WP eCommerce, BigCommerce, etc available in the market. You can implement the best eCommerce plugins on almost all the pages of your store.
Choosing the apt eCommerce plugin is vital for the growth of your enterprise because an improved platform means more fortune and success.
But not all those plugins will have the entire bundle of characteristics you are looking for. Therefore, choosing the apt eCommerce plugin is vital for the growth of your enterprise because an improved platform means more fortune and success. If you want to start an online store that sells physical products, the WooCommerce plugin is the most popular choice. Whereas for selling digital goods like ebooks, EDD is the best choice(click here to know why). Many a time, users turn out to be losing money because of the lack of decent research on the eCommerce floor to start their store.

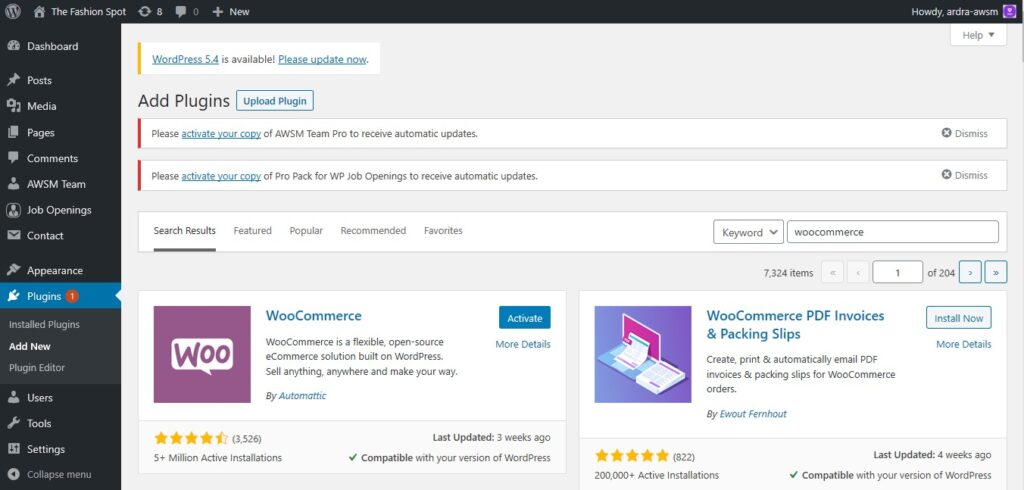
Once you have chosen the appropriate plugin for your WordPress site, it’s time to install it. For that, sign in to your WordPress dashboard. On the sidebar, go to the “Plugins’’ option and click on “Add New”. In the search bar, insert the name of the plugin you have chosen and hit Enter. Click “Install Now”. The prescribed plugin will be applied to your website.
2. Select an eCommerce friendly theme
Choosing the appropriate theme helps to present the total layout and mood of your site. Spending your time to find a strong theme that converts browsers to buyers is always worth it. For default themes, just click on “Appearance,” above the plugin option, and then select “Theme”. A collection of themes will appear. You can select the required eCommerce theme from there and it will be applied to your website.
For your shop to look and work perfectly well, ensure that the theme you are opting for is appropriate for the plugin that you have installed.
Suppose you don’t like any of the default themes, then you can smoothly add a new theme. Select “Add Theme” where you can access a theme library. If you like any of the themes in the library, click “Install” and then “Activate” to place the theme. Thus, you can change your website’s display easily. For your shop to look and work perfectly well, ensure that the theme you are opting for is appropriate for the plugin that you have installed. For a WooCommerce shop, they also regulate how your products are presented.

3. Set up the product page
Now that you have your plugin and theme set up, it’s time to start adding the products and the product pages which is the most essential component in an online store. Since every plugin behaves differently, for convenience, we are going to stick on to the workings of the WooCommerce plugin here.
In the WooCommerce plugin, every product that you add must have at least the following information – name, image, price and a brief description of the product.
Just after clicking the “Activate Plugin” button, the WooCommerce will ask for your approval to install the principal configuration of an online shop. If you go to your pages, you will find the Main page, Shopping cart, Payment page and Order detail page automatically created for you. In the WooCommerce plugin, every product that you add must have at least the following information – name, image, price, and a brief description of the product.
Start by entering your WordPress admin panel, then select “Products” on the sidebar and click on “Add Product”. Every time you need to add a new product, all you have to do is to click Products/Add new, and then provide the above-mentioned details about the product.
You can also go to the WooCommerce Settings and go through the General settings, Product settings, General subtabs, Display sub-tabs, etc. in order to customize them.
4. Payment
The final step in any WordPress eCommerce setup relates to the payment of the product. All online stores need a means of receiving payments from customers.
To make use of the features of payment gateways, you need to have an SSL certificate.
Most online financial activities occur through payment gateways like PayPal which are services that act as a mediator between you and your customer. To make use of the features of payment gateways, you need to have an SSL certificate. This ensures that all transactions, and thus the transfer of financial information, between the seller and buyer, are safe from the hackers. SSL certificates can be obtained through your hosting provider for a fee.
After completing all these steps, you have created your online shop with WordPress. There are a lot of people who bid goodbye to their dream of starting an online store because of their fear of technical issues, and you have already put that step behind you. Now, you get selling and we get shopping! If your dream store is not the one that sells physical goods, but digital goods, here is the perfect guide for you.
Some Frequently Asked Questions about creating online stores
Can I make a good online store with WordPress?
Definitely. You can both create content and sell products from WordPress. It offers one of the best eCommerce experiences at affordable rates. With innumerable plugins and themes, you can customise products, attract customers, and increase your sales.
Which plugins can I use to build an online store?
There are so many eCommerce plugins for you to choose from. Some of the most popular ones are WooCommerce, BigCommerce, Easy Digital Downloads, Ecwid eCommerce Shopping Cart and WP EasyCart. Before selecting the plugin do thorough research to see if the plugin is perfect for you – read through the reviews from other users, check the frequency of updations, the support available etc.
Should you use different plugins for physical and digital goods?
For selling physical products, people usually use the WooCommerce plugin and for selling digital goods like ebooks, Easy Digital Downloads is more commonly used.


