


Ask yourself, how well is your website optimized for your visitors and the audience? There is a fine line between them. For the audience aspect, you can entice them with the content and spread the focus to services, and products, how they are useful, and so on. But when it comes to website visitors the entire focus should be on accessibility. This is because the way different users interact with the website will vary.
By focusing on accessibility for your WordPress website, you are making sure that the website experience remains the same for all, even for people with various disabilities. This will ensure that you can expand your reach to a wider audience.
We will explore accessibility in WordPress, the top mistakes, and how to avoid them.
What is Web Accessibility and Why You Should Focus on It
There are various building blocks when creating a website, from the design, the choice of colors, and the content. All of this plays a part in engaging the audience. However, this engagement is only possible if the users interact with your website. Making the end product usable to “every user” is the most important aspect. It is this interaction that makes it possible to turn your website visitors into users.
No, we are not referring to the multilingual aspect or making it responsive, but making sure that the website is usable even for people with various disabilities. This is where the accessibility factor comes in. By focusing on WordPress accessibility, you are ensuring that all the website visitors are able to interact and grasp what is on your website.
This helps you reach a wider audience, which means more interaction and a step closer to your goals.
Also read: WordPress Accessibility Plugins That You Should Consider
How to Make Your WordPress Website Accessibility Ready
Focusing on WordPress accessibility is not a daunting task, surely there are a lot of areas to focus on, but it is doable.
1. The choice of colors
The selection of colors for your website holds significant importance, serving not only to highlight your brand but also playing a vital role in enhancing accessibility for visitors with visual disabilities.
Carefully choosing an appropriate color palette with optimal contrasts is vital, as it will improve the reading experience for those with visual disabilities, enabling them to perceive text and buttons like any other user.
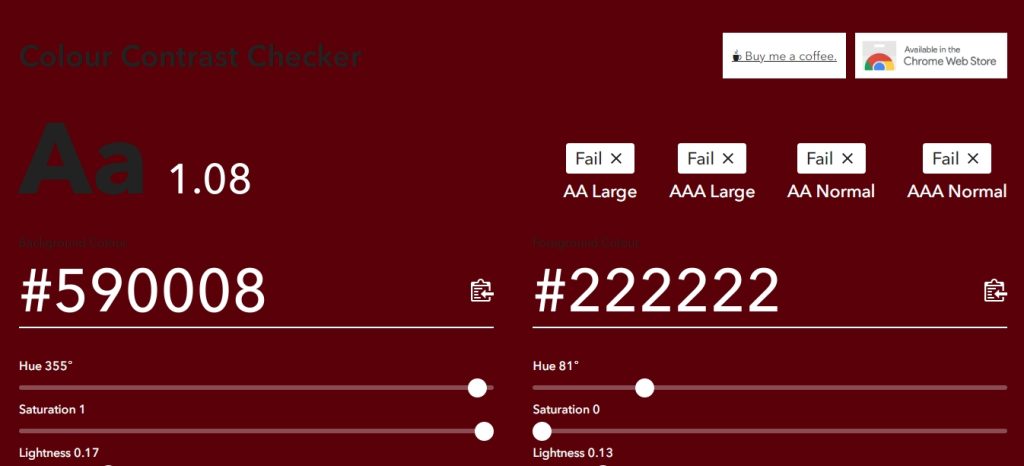
This, in turn, will allow them to interact with the website, which is what you want as a website owner. The standard guideline from WCAG is to use a contrast ratio of 4.5:1 for regular text, but for large text, the ratio is 3:1. But how do you know that the color contrast that you have opted for your website is the right one?
Various online tools like Color Contrast and Coolors will show whether the selected combination is the right one or not.
2. The fonts
Once you opt for a color contrast that is easy on the eyes, it is time to move on to the content. In all cases, while choosing a font, the primary focus will be on the style quotient which can backfire in terms of WordPress accessibility.
First of all, there is no accessibility-ready font out there. Finding the right font will take trial and error. Before finalizing a font, check if the styling of the letters and numbers look similar. If so this can confuse people with visual disabilities and make it hard to differentiate between them. One needs to avoid such fonts as they will affect the website experience. An example is the Tektur font. From an accessibility standpoint, this is not the best font.
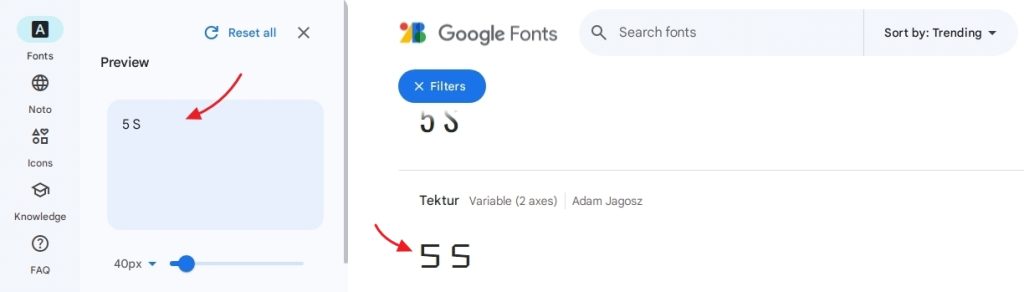
As you can see in the above image, the difference between the “5” and “S” is not much. Fonts such as these are not great from an accessibility standpoint. Also, make sure that the font size is a minimum of 16px.
WCAG 2.1 guidelines also talk about the text spacing aspect that one should follow. The line height, letter, and word spacing have to be followed strictly to maximize the accessibility of your WordPress website.
Also read: A Complete Guide on How to Host Fonts Locally in WordPress
3. Incorporate keyboard navigation
Once you have the design and content set up, it is time to move to the navigation aspect. The focus should be to allow users to navigate the entire website with the help of a keyboard and not limit it to the use of a mouse or trackpad. This involves tackling all the menus, buttons, links, and so on.
To enable this, a lot of effort has to be put into the coding side. Once this is done, proper testing has to be done to ensure that all the elements are navigable with the keyboard and function as expected.
When implemented it allows the users to use the tab, spacebar, arrow, shift and enter keys to interact with the website.
4. Enable support for screen readers
When it comes to screen readers, making it work throughout the website is what is important. For the images, one can add the appropriate alt text to it. But for navigation and other pieces of content, a bit more effort and time is needed.
Assigning proper HTML tags for the headings, paragraphs, buttons, and so on is the right way for the content and other aspects. Now using the proper tags not only improves WordPress accessibility but also helps with the SEO aspect as it helps the web page crawlers.
5. Optimize the video content
If most of your content is conveyed through videos, adding captions and transcripts for accessibility is mandatory. Firstly, adding captions allows people who are deaf to understand the content of the video. Make sure to add the captions in as much language as possible.
Now, coming to the transcripts, they are added so that the screen readers can access the content of the video.
6. The theme
The theme aspect is something that will vary depending on the users. Some users will develop their theme from scratch whereas others will opt to go with one from the theme repository. If you are building from scratch you have full control over it.
Now for those opting for themes from the repository, the solution is already there. There are a lot of accessibility-ready WordPress themes readily available.
Also read: In-depth Guide on How to Remove Tracking Cookies in Your Browser
How to Test Your WordPress Website for Accessibility
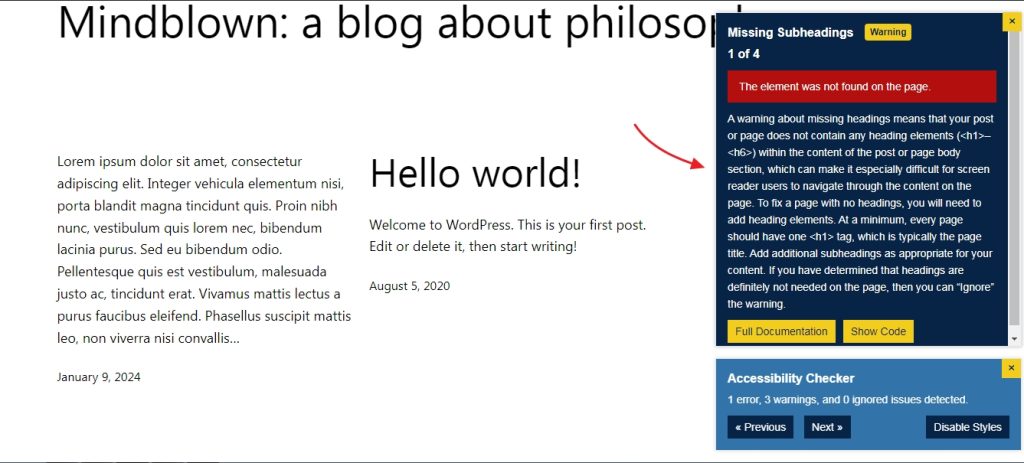
Be it on an already live website or one that is in production, testing the accessibility of your WordPress website can be done in three ways. Either through automation testing tools, manually, and then with the help of plugins. One of the most popular plugins is the Equalize Digital Accessibility Checker.
Once activated, it will show a warning like this that highlights the various issues.
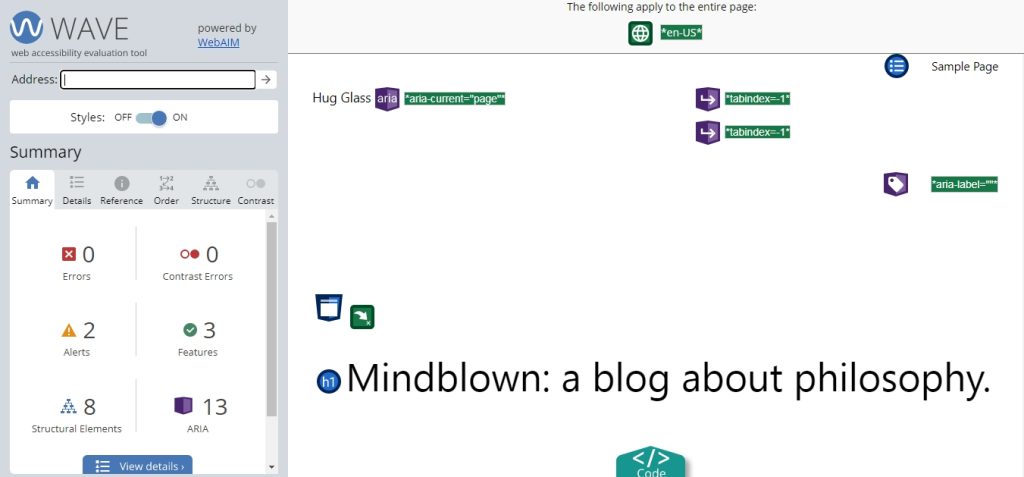
Wave is a popular online tool that one can use for checking WordPress accessibility that doesn’t involve any sort of installation. Enter the website URL and it will show the existing problems that one needs to solve.
Wrapping Up
WordPress accessibility is an important aspect that all website owners need to take into consideration. This will ensure that all the website visitors can interact with the website.