


We’ve all been in this situation before, where we had to open a lock in the pitch dark with several keys in hand. It’s a bit of trial and error, trying different keys until one unlocks it. For an outsider, your website’s login page is sort of like a lock, where they try their luck at gaining access. Instead of keys, they try several usernames and passwords.
An outsider accessing your WordPress dashboard is every site owner’s worst nightmare. Years of hard work and countless sleepless nights of effort can be wiped away in seconds. Login credentials are what prevents an attacker from gaining access to the dashboard, but with an unlimited number of login attempts that WordPress supports by default, it’s just a matter of time, before someone manages to barge in. The only way to avoid such a scenario is by limiting the WordPress login attempts.
We will take a look at why the need to limit login attempts in WordPress, how vulnerable your website is, and how to tackle this issue.
What is a failed Login Attempt in WordPress?
We need a username/email address and a password to login into the backend of WordPress. The same applies to other websites. A failed login attempt happens when users who have access to the backend input the wrong email address/username or password, most often a typo. Once you enter the right credential, you are granted access to the website’s backend. From there you can make the needed changes, tweak the site settings, and so on.
The two main scenarios for a failed login attempt in WordPress are:
- Right username and wrong password or vice versa
A genuine user might have entered the wrong credentials, mostly because of a typo. Most of us have experienced this from time to time. The scenario where it gets a bit worrying is when you see a surge in failed login attempts from a certain number of users over a prolonged period of time. If so, then an outsider has figured out the username of one of the users and is trying to guess the password through a brute force attack.
- Wrong username and password
This is a classic case of an outsider trying to break in with a brute-force attack. The attacker is just trying out his/her luck, and may or may not succeed, but since WordPress by default supports unlimited login attempts, it is always worth a shot.
A failed login attempt is not a case of concern as long as the person who is trying to sign in is a verified user. But the real problem starts when an outsider does this over a prolonged period of time and you don’t take any steps to counter it.
Also read: 7 Ways To Protect Your Website From DDoS Attacks
How Susceptible is Your WordPress Website?
It doesn’t matter whether you are the owner of a website that sees a lot of traffic or a small one, you are still vulnerable to attacks. You may not realize it but your WordPress security out of the box is not as tight as you think. There are mainly two reasons for it:
- Login URLs
- Unlimited Login attempts provided by WordPress by default
Login URLs
The way to sign in to the backend of WordPress is made possible with two URLs. It is always websitename/wp-admin or websitename/wp-login.php. This is where the initial problem starts. This login URL is standard for all WordPress websites until you change them to a custom one. So, the attackers already know the doorway to your dashboard.
In fact, they most probably have visited the login URLs and tried several username and password combinations. This is the first stage of the attack, to see whether you will take any countermeasures against a rise in failed login attempts.
Unlimited Login Attempts Provided by WordPress by default
So reaching the doorway that leads to your backend is not at all complicated. Now, if you are confident that the login credentials will act as the barrier that will prevent the attackers from barging in, well then you are not entirely safe. There are two factors here. One is the users which we will discuss in detail shortly and the other half is the login attempts.
Since WordPress offers an unlimited number of login attempts, attackers are free to unleash a Brute Force attack. This is a trial and error method where they guess the username and password. This is done through automated scripts and tools. In most cases, they have already figured out the username and are trying to guess the password. The main reason why we want to limit the number of login attempts is to deter the attackers from carrying out a brute force attack.
How Users Can Compromise Your Website�??s Security
The weakest link when it comes to the security of your website is the users. There will always be a user that creates a weak password. They prefer to use words that are easy to remember, usually their favorite color, a character from their favorite movie or book or pet’s name, or common ones like umbrella1234 or admin7410, purple8520, and so on.
First and foremost never use your favorite food, color, pet’s name, or anything that is easy to guess as the password. Make the password complex. Make sure that the password length is a minimum of 8 characters. The more characters the better it is. The password should also be a combination of numbers and symbols so that guessing the password won’t be that easy. The more random and unique you can make the password, the better security that is on offer.
Brute force attacks leverage such negligence on the user side to gain access to the backend of your website. By choosing an inherently weak password, you are sending out invitations unknowingly to attackers. A weak password combined with unlimited login attempts and a bit of luck can result in a successful brute-force attack.
Also read: 7 Ways To Protect Your Website from Cross-Site Scripting Attacks
Why Do You Need to Limit WordPress Login Attempts?
If the thought of an outsider gaining access to your WordPress dashboard doesn’t scare you, then there is no need to limit the login attempt. But if you are the other half, that doesn’t want to give up years of hard work and lose the trust of the users’ then limiting the login attempts in WordPress is a must.
The damage that an attacker can do when they gain access to your WordPress website through brute force are:
Steal Confidential Information
One of the main reasons why an attacker takes all the time and effort to break in is to steal information regarding the users. It could involve the email address, the details of their saved payment methods, and so on.
Embed Malicious Content
What’s the best way and fastest way to spread malicious content? By targeting an unsuspecting website and embedding malicious content. This way the malicious content gets spread to users who are unaware of it. It could be anything from a drive-by download or a redirect to a website that houses malicious content that is far worse. The attacker can also host and redirect the users to phishing pages.
Service Disruption and Vandalism
With access to the backend dashboard, the attacker can wreak havoc in minutes. The attacker can make changes to the payment gateway, change the pricing of your products, change the description of the entire site, change the theme, and so on.
So, if you want to avoid the above-mentioned situations, then limiting the login attempts in WordPress is a good way to go.
Also read: WordPress Security and Maintenance: How Not to Get Hacked
How to Limit WordPress Login Attempts
Even if you make the password unique and strong, break-in attempts via brute force attack are going to happen. In such cases implementing the use of Captcha, two-factor authentication along with a limited number of login attempts will make sure that a brute force attack is stopped in its tracks.
By combining all these three, you are telling the attackers that you are fully aware of possible brute force attacks and have taken all the countermeasures. There are two ways to limit the login attempts in WordPress:
- With the help of a plugin
- By setting the limit manually
Set WordPress Login Limit With the Help of a Plugin
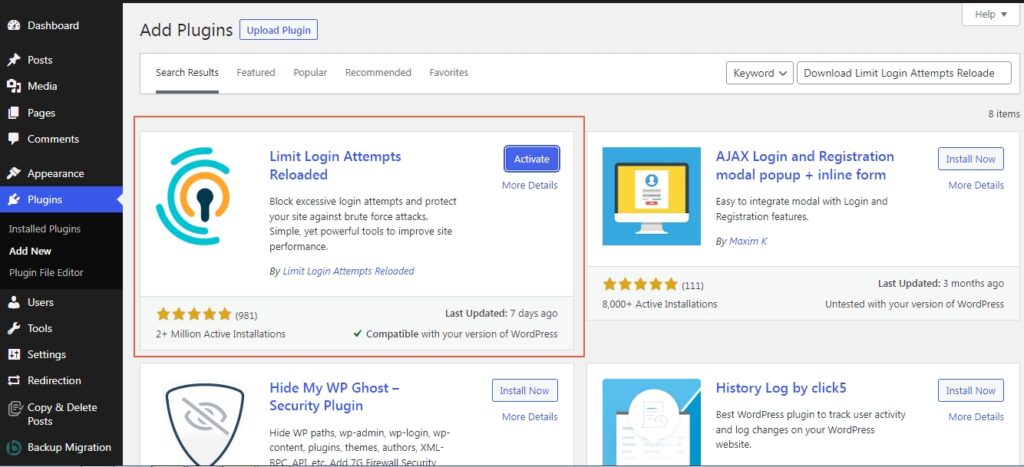
The easiest way to limit login attempts is with the help of a plugin. There are a lot of plugins available in the repository that offers login protection like Wordfence, Limit Login Attempts reloaded, and more. But for now, we will be focusing on the latter.
Install the plugin from the repository and activate it.
Now access the plugin from the settings menu and head over to the settings to configure the plugin:
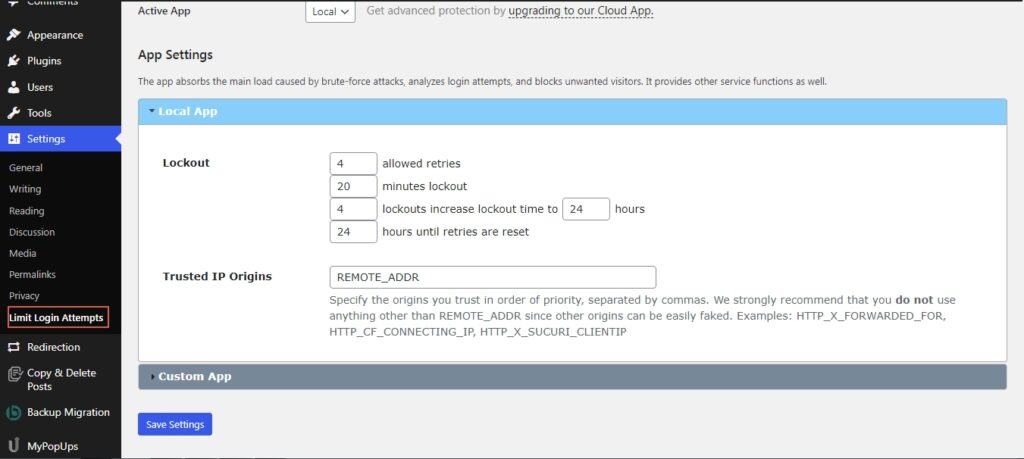
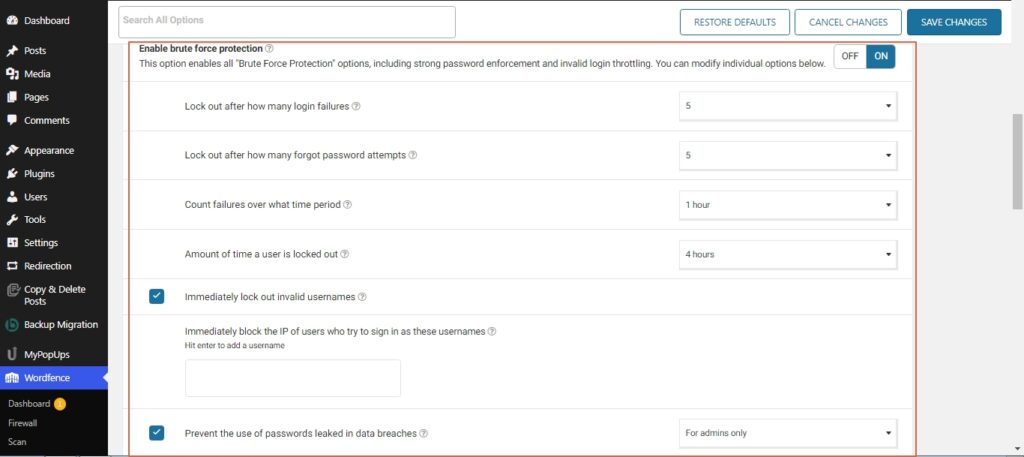
This is the section we are interested in. We have four tabs that determine the login attempts to your WordPress backend and what happens once the login attempt threshold is crossed. The first box stands for how many times a user can try to enter the login credentials, and the second box which is the time frame will determine how long the user has to wait to try again.
If the user enters the wrong credential after a certain number of tries which can be defined by the third box, the user will be locked out for a longer time which is defined by the fourth box.
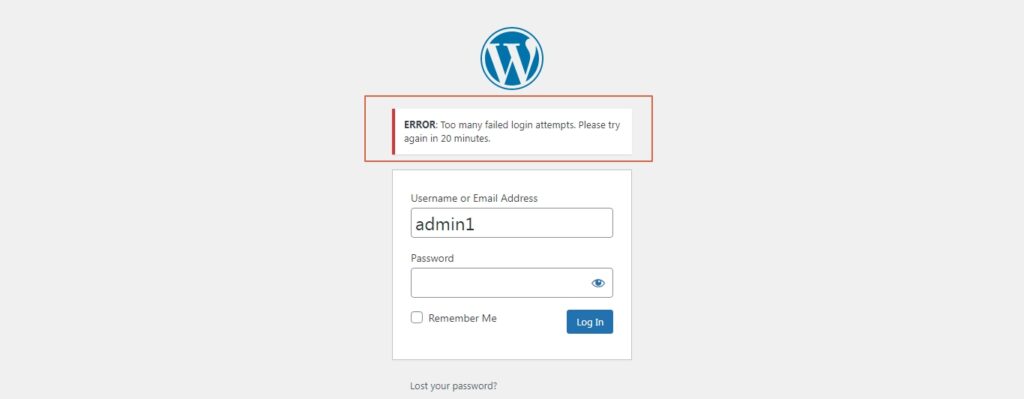
Once you have configured the plugin settings, if a user tries to log in with the wrong credentials they will be presented with a screen that shows how many attempts they have left.
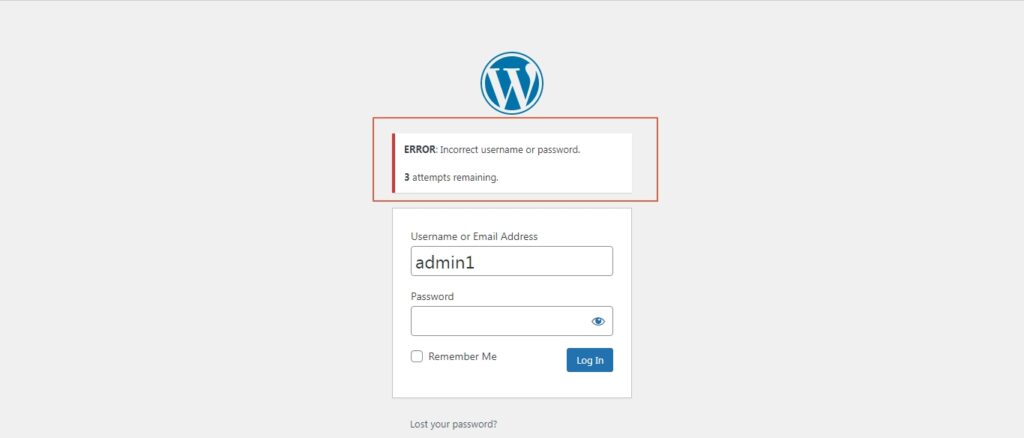
Once they have reached the limit for the login attempt, they will be locked out for a user-defined time frame.
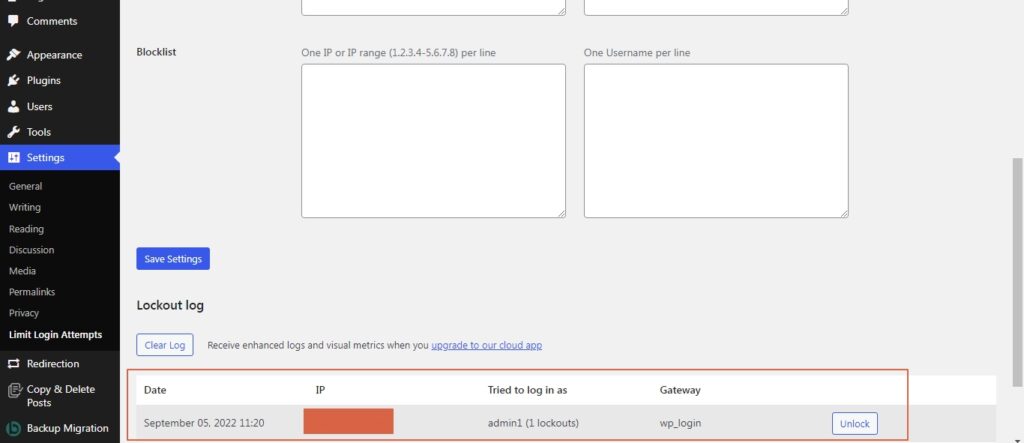
The plugin will also save logs of the event so that the site administrators can take the appropriate action. It will record the username that was logged out and also capture the I.P address.
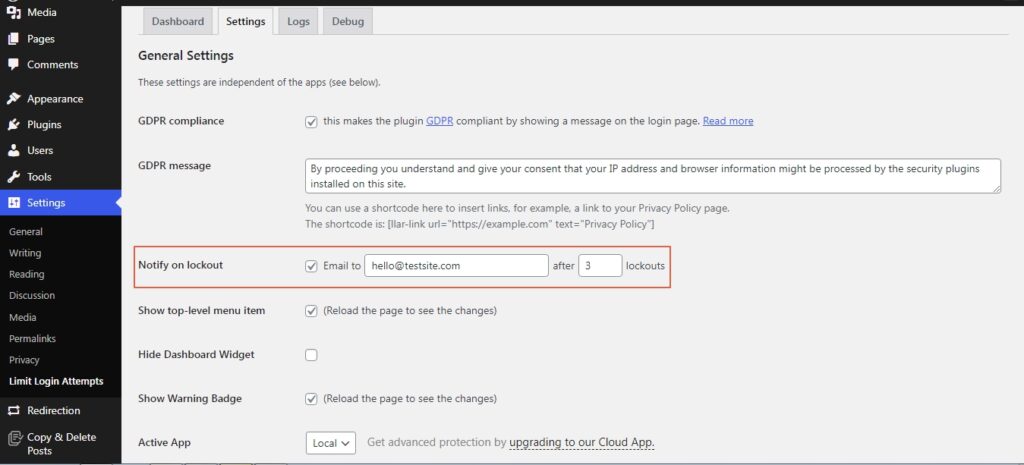
The plugin will also notify the admin when a user gets locked out after 3 attempts. This can be modified as per the requirement.
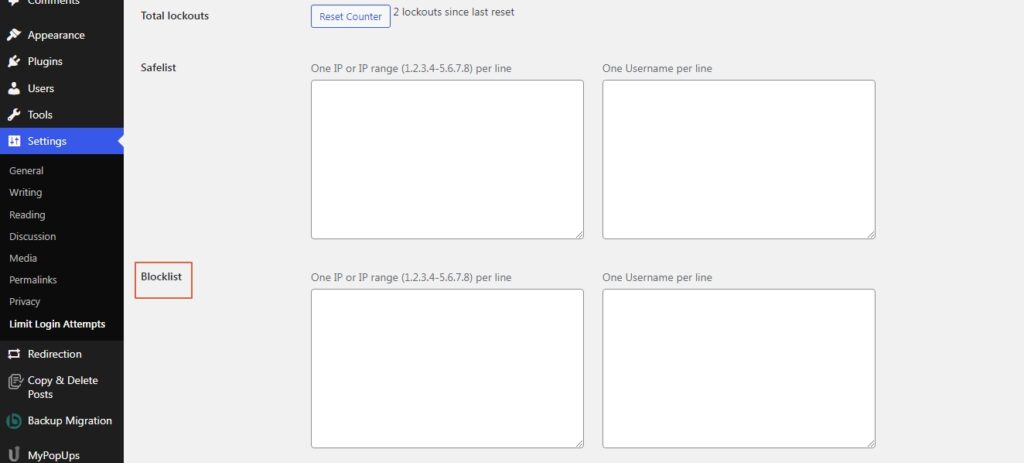
If needed you can also block out I.P addresses from which the login attempts are being made:
If you decide to use the Wordfence security plugin, head over to the brute force attack option and customize it according to your liking.
This is all you need to do, to set a limit for the login attempts to your WordPress site. By setting a limit to the number of login attempts, you can essentially break the flow of the brute-force attack. With no limit for login attempts, the brute force script can run for a prolonged period of time. But by setting a limit, we are making the task a whole lot difficult for the attackers which in most cases will let them know that we are fully prepared and have covered all loopholes to protect our website.
Also read: How to Add Two-Factor Authentication in WordPress?
How to Set Login Limit for WordPress Manually
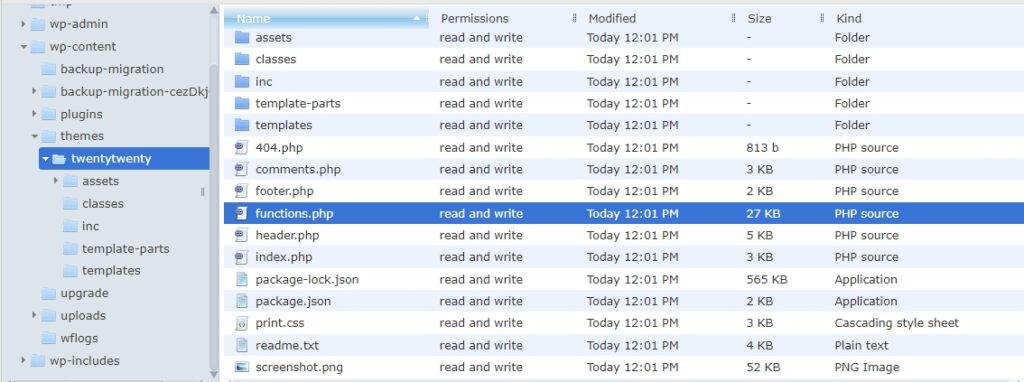
Now, if you don’t like the idea of limiting login attempts in WordPress with the help of a plugin, you can also enable it manually. In order to define the number of login attempts manually, head over to the active theme’s folder and open the functions.php file:
Now add the below code snippet to the file and save it:
function wpcontentco_check_attempted_login( $user, $username, $password ) {
    if ( get_transient( 'attempted_login' ) ) {
        $datas = get_transient( 'attempted_login' );

        if ( $datas['tried'] >= 3 ) {
            $until = get_option( '_transient_timeout_' . 'attempted_login' );
            $time = wpcontentco_time_to_go( $until );

            return new WP_Error( 'too_many_tried',  sprintf( __( '<strong>ERROR</strong>: You have reached authentication limit, you will be able to try again in %1$s.' ) , $time ) );
        }
    }

    return $user;
}
add_filter( 'authenticate', 'wpcontentco_check_attempted_login', 30, 3 );
function wpcontentco_login_failed( $username ) {
    if ( get_transient( 'attempted_login' ) ) {
        $datas = get_transient( 'attempted_login' );
        $datas['tried']++;

        if ( $datas['tried'] <= 3 )
            set_transient( 'attempted_login', $datas , 300 );
    } else {
        $datas = array(
            'tried'     => 1
        );
        set_transient( 'attempted_login', $datas , 300 );
    }
}
add_action( 'wp_login_failed', 'wpcontentco_login_failed', 10, 1 );

function wpcontentco_time_to_go($timestamp)
{

    // converting the mysql timestamp to php time
    $periods = array(
        "second",
        "minute",
        "hour",
        "day",
        "week",
        "month",
        "year"
    );
    $lengths = array(
        "60",
        "60",
        "24",
        "7",
        "4.35",
        "12"
    );
    $current_timestamp = time();
    $difference = abs($current_timestamp - $timestamp);
    for ($i = 0; $difference >= $lengths[$i] && $i < count($lengths) - 1; $i ++) {
        $difference /= $lengths[$i];
    }
    $difference = round($difference);
    if (isset($difference)) {
        if ($difference != 1)
            $periods[$i] .= "s";
            $output = "$difference $periods[$i]";
            return $output;
    }
}
That’s it. You have limited the login attempts to 3.
Wrapping Up
Putting an upper limit to how many times someone can try to log in at a go is essential to stop brute force attacks. By limiting the number of tries you are essentially stopping the brute force attack from stretching its muscles. Once the attacker realizes that you have fortified your website’s security, they will lose interest and move on.
Some Frequently Asked Questions About Limiting Login Attempts in WordPress
How do I limit the login attempts in WordPress?
You can limit the login attempts either with the help of a plugin or do it manually. You can edit the functions.php file and define the number of login attempts
Why are there so many failed login attempts?
Seeing a surge in failed login attempts can be a telltale sign of a brute-force attack. Taking the appropriate steps will ensure your website security remains uncracked.
How do I monitor failed login attempts?
In order to keep track of failed login, you can use activity log plugins like WP Activity Log, Activity Log, or Simple Login Notification.
How do I block login on WordPress?
You can block out certain users from logging in using a plugin such as Limit Login Attempts Reloaded or User Blocker.