


Are you intending to create an online store and looking for a tutorial to help you install WooCommerce? Congratulations! You have selected the right article to guide you through the process. For beginners, we have already shared an article on how to set up an online store with WordPress. Whereas, in this article, we are going to discuss the procedure to set up an eCommerce store with the WooCommerce plugin in just 6 steps.
Why WooCommerce?
Though WooCommerce is only one of the best eCommerce plugins available in WordPress, it is undeniable that it offers the best functionality of your online store. It is by far the most popular eCommerce plugin to integrate with any WordPress based Website.
The plugin was launched on 27th September 2011 by a company called WooThemes. Wocommerce soon became popular and made people consider WordPress as a reliable platform to start their online store. In 2015, WooCommerce achieved 7 million downloads, powering 30% of all online stores, and was acquired by Automattic.
The core attraction of WooCommerce lies in the fact that it supports the sale of both physical as well as digital goods, along with services, subscriptions, and many more. With a lot of free and paid extensions, WooCommerce makes it simple and painless to create and build up your store. Thus, making it possible for you to start adding products in a few minutes.
WooCommerce is the perfect choice for beginners, small or large business owners who wish to have their presence in the online shopping world.
You can also find lots of customization options and themes that help you to give a ‘benchmark’ look to your store. WooCommerce is the perfect choice for beginners, small or large business owners who wish to have their presence in the online shopping world. So, let’s dive and get started into the easiest way of WooCommerce installation.
Choosing a domain name and Hosting Provider
To have WooCommerce, as usual, you must have a domain name and hosting provider. If you are making a fresh start, you can go to WooCommerce.com/start to get an elemental site on board. If you have already created a self-hosted WordPress site or a WordPress.com site, head to the Plugin section in the dashboard to search, add and activate the WooCommerce plugin.
You can also refer to our previous article on How to create a website where we have discussed in detail how to set up a WordPress website. While choosing the hosting provider, you need to ensure that it offers security, customization and supports your theme and WooCommerce plugin.
WP Engine offers 3 Months free on hosting plans (Coupon Code – WPE3FREE)
Installing WooCommerce
As mentioned earlier, if you have already created a WordPress site, you can navigate to Plugins > Add New from the WordPress backend dashboard. Search for WooCommerce in the search bar. Once you find it, click on Install. And now hit on Activate.
Setting up of WooCommerce
Once the installation is done, it’s time to configure the plugin’s settings. Every new installation of WooCommerce starts with a setup wizard for knowing what kind of currency you will use, the kind of products you sell and more. It helps to finish the WooCommerce setup process quickly. Just click on the Run the Setup Wizard to get initiated.
Next is the most important part of the WooCommerce setup. i.e., the configuration part. WooCommerce configuration framework will appear in front of you which will help you to customize the WooCommerce. Now we will give a step by step guide for setting this up.
- The store setup: The first part is the Store setup where you will have to add the store’s location, the kinds of products you sell and more. Now, click on Let’s go to head to the next part.
- Payment setup: The options for this part is based on the location of your store and the type of product you choose to sell. If you didn’t tick on the “selling products or services in person” in the first part, then you’ll only see Stripe and Paypal as options for accepting payments. If you want you can also go for an offline payment method by just clicking on the dropdown arrow.
- Shipping setup: The third part allows you to set up Shipping. If you trade physical goods on your WooCommerce store, you can set up shipping zones, shipping methods, fees, etc. from here. WooCommerce offers two shipping zones: Zone 1 belongs to the USA and Canada whereas Zone 2 is for the rest of the countries. If your store is located in the first zone then you can also have the live shipping rate option. Don’t forget to select ‘Print shipping labels at home’ to get your credentials printed.
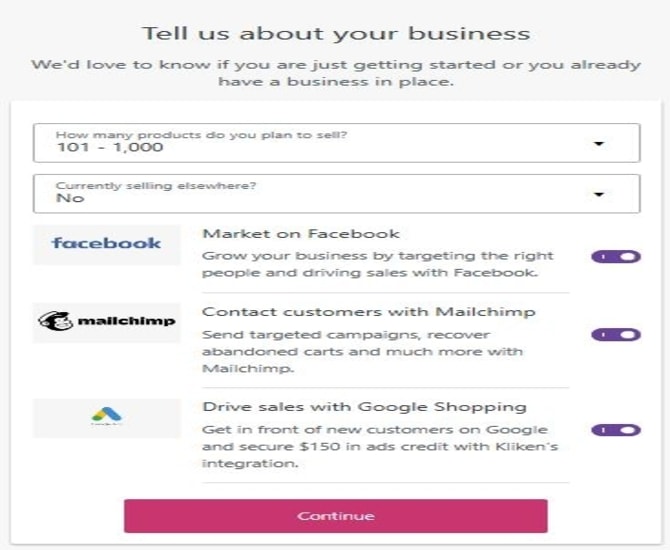
- Recommended: Give tick mark on Automated taxes, Mailchimp, and Facebook if you want to get tax calculation and email service in your store. The required plugins such as Jetpack will be automatically installed.
- Activate: The fifth step is activating the plugin where you will be asked to continue with Jetpack. Click continue with Jetpack if you wish to have that plugin otherwise select skip this step.
- Ready: Now you have landed on the last page of the setup wizard. From this page, you can create, import products, visit the dashboard or review the entire settings.
With this, you are done with the WooCommerce configuration process. As you go through each of these steps practically, you will realize how easy it is to set up WoCommerce. Now, you’re ready to add your first product to your online store.
Liquid Web offers Managed WooCommerce Hosting at just $19/month
Get the deal
Adding Products to your WooCommerce Store
In order to add your first product, all you need to do is go to Products in the dashboard and select Add New. Then, enter the name of the product and provide a description of the same. After this, Scroll down to the Product data box where you can give the price of the product, set up inventory, shipping, etc.
If you scroll down again, you can see a Short Description box to add a short description of your product. By filling this box, your customers can see the description you have entered when viewing multiple products on the same page.
After completing all this, move the cursor to the right column to set up categories, tags, and product images. You can click the Add new category option to add a new category. You can also add new Product tags or choose the tags from ‘the most used tags’ option. Below Product tags, there’s a Product image option. You can add your product photo there. Once you’ve completed setting up all the options, you can happily publish your first product. Repeat the process for adding each new product.
Choosing the theme
We know that theme determines the total layout and mood of your site. But, for an Online store, they also regulate how your goods are displayed. If Bluehost is your hosting provider, it automatically installs the official WooCommerce theme, Storefront for your store. But you will have to personalize it to meet your needs. For that, go to Appearance > Customize page. This will provide a theme customizer where you can alter the theme settings.
If you don’t like the Storefront theme, you can install a theme from the WordPress repository or buy themes from third-party theme companies. By now you must be familiar with selecting a theme from WordPress library, installing the theme and activating it, so we are not explaining it again and bore you all.
This concludes your process of creating an online store with WooCommerce and we hope this article has been helpful. On the other hand, if you prefer to start an online digital store that sells only digital files like eBooks, music, videos, etc then you have Easy Digital Downloads.
Some Frequently Asked Questions
Is WooCommerce costly?
NO. WooCommerce is a free eCommerce plugin. You can download, use and modify it for free. It is also very user-friendly and you can use it without knowing any coding. The base version is free but you have to pay for some of the extensions. The pricing is very reasonable. WooCommerce is made by Automattic.
How can I customize my Woo theme?
Some things like adding the logo, background etc are built into WordPress and controlled by the Customizer. For more customization, you will need a bit of HTML, PHP and CSS knowledge. The best approach is to use a child theme to house customizations and modifications. You can also refer this document .
Whom can I contact for support?
You can put a ticket for support or go to the Help Desk to start a live chat. Currently there is no phone support. You can also search their Documentation for answers.
How can I renew my free product?
You don’t have to renew a free product. They are automatically renewed and you can continue to access the support and updates.
How many products can WooCommerce handle?
WooCommerce can easily handle thousands of products. WooCommerce by nature needs more memory than a basic WordPress install but you should be safe if you have a decent and reliable hosting provider.