


The way your website pops up in search results surely plays an important role in the number of visitors you get. Therefore, it’s crucial to seek out new ways to enhance how your site is mirrored by search engines to push more high-quality traffic your way.
One such latest evolution in the field of Search Engine Optimization is called Schema markup.
Schema markup can contribute to boosting your SEO, offering increased data to search engines along with using other tools like social media platforms and Google knowledge panels.
In this post, we’ll explain what Schema markup is and how to include it on your website.
What is Schema?
Schema markup is a code or metadata that you add on your website to help the search engines give more informative and accurate results for the users.
Though the users won’t ever see these codes, search engines like Google, Yahoo, etc use it to identify with your content and incorporate something called rich snippets.
Adding only the keywords or title tags doesn’t give search engines the entire information they need in order to fully understand what your site is about and who it would appeal to. And that’s where adding Schema markup comes into play.
For example, let’s say the word “J K Rowling” appears in the text of your article. Schema markup tells search engines what this data means: Is it the name of the post’s author or a character in a television series or something else?
Schema markup adds an extra layer of data to your content. It tells search engines whether this is about an organization, a person, a place, a movie, etc.
The search engine sees this, and produces a SERP (Search Engine Result Pages) entry with “J K Rowling.” However, if we put the right schema markup around the name “J K Rowling,” i.e, if she is the author of the article, mention that in the search engine so that the search engine provides results that display better information for the users who were searching for “J K Rowling.”
This enables searchers to know how your content can provide the information they are looking for. In the example above, Schema markup would help assure readers that they are going to read some article written by J K Rowling.
Thus schema markup adds an extra layer of data to your content. It tells search engines whether this is about an organization, a person, a place, a movie, etc.
Also read: SEO Simplified for Beginners
Why is Schema so important?
By using Schema markup it’s not just that your pages will be found in search results, but also you will get authentic knowledge panels in Google and your social media accounts will be linked effectively to your website to boost your search rankings. There are various kinds of markup types—from toy stores to beauty products. If you are having a personal blog, you can tell search engines that your site represents a person and who that person is. Whereas if your site represents an organization or business, you will be mentioning something different.
There are dozens of different schemas that you can put in place, and Google currently supports over 50 different schemas. Take some time to browse the list and see what kinds of relevant schema you can add to your site. Some of the most common forms of the schema include:
- Reviews
- Recipes
- Events
- Products
- Local Businesses
Now, let’s talk about how to use schema markup on your website.
How can you add schema to WordPress?
You can use Google’s Structured Data Testing Tool to check if you have any existing schema installed on your site. At times your WordPress theme will have built-in schema markup. You can paste your site’s code or use the URL for testing. After you run your site through the tool you can see which schema is active and if any errors are present.
If there is no schema in your website, there are different ways you could use to add it. WordPress and the range of plugins available allow you to smoothly and adequately automate the process of adding schema to pages. Here we are going to stick on to the easiest method, that is by using a plugin called All in One Schema Rich Snippets.
Also read: Best WordPress Search Plugins
All in One Schema Rich Snippets help you optimize your website by including Schema metadata to your website. It allows you to make your website emerge in search results by showing star ratings below a review, prices of products, image or video next to the description, etc.
Step 1: Install All in One Schema Plugin

To begin, install and activate the plugin(from the WordPress repository) on your WordPress site, then select the Rich Snippets tab on your WordPress dashboard.
Step 2: Configure the settings
Once you have activated the plugin, the schema markup functionality is added to your WordPress site. But if you want, you can configure the settings. After that, each post or page you create requires you to mention if you’d like to show the schema markup on your search results.
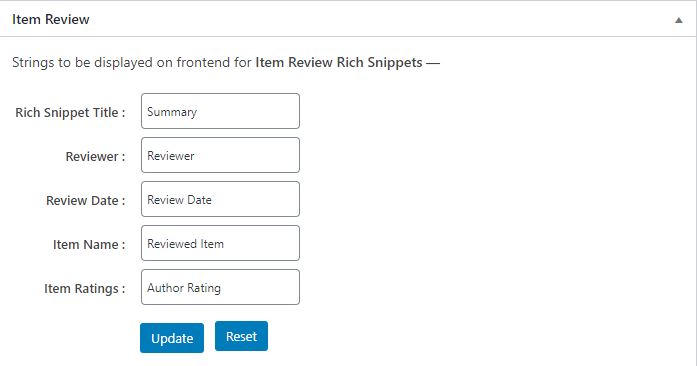
On the Rich Snippets page, you will see a configuration tab below which all of the schema markup types such as item reviews, events, products etc are shown.

When you click on one, such as Item Review, several fields are shown, defining which rich snippets show up on the frontend and on the search results. You can also customize the look of the rich snippet box by giving rich snippet title, review date, item name etc. After customization(if needed), click on the Update button.
Step 3: Create or edit a post
As mentioned earlier, the schema markup doesn’t appear for a post/page unless you activate it individually. Therefore, go to Posts > Add New, or find a post you already created to add schema to WordPress. So after entering the title and body to your post, scroll down the text editor to find the schema markup tools.
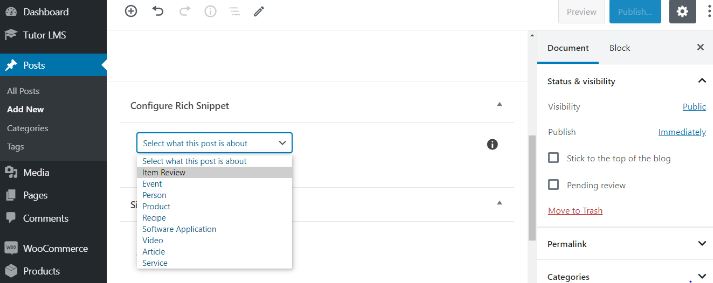
Step 4: Configure rich snippets on the post
Once you find the Configure Rich Snippets module, select the drop-down menu to see your options. For example, here we are taking an Item Review. Each schema markup option is different. The Item Review schema asks for the reviewer’s name, item to be reviewed, and a rating. After publishing or previewing the post, you can see the rich snippet towards the bottom of the post.
If you want even more features, you can opt for the paid Schema Pro plugin.
Another commonly used plugin to add Schema Markup in your website is the Schema plugin. Just Install and Activate the plugin. Head to its settings to start configuring the plugin. It will ask your basic information location of your About Page, Contact Page. If you have a logo, upload that also. By filling out the additional sections, content, knowledge graph, and search results you can optimize your site for each of those areas. Last, you can navigate to Schema › Types and add specific schema to a type or category of post.
Wrapping Up
Adding a schema to your site doesn’t take a lot of time, and it can improve your search engine appearance and website traffic. Plus, the number of plugins available make even basic implementation of schema very simple. Even though you can also add schema to your site manually, it is more code-intensive. So for those without any coding and technical knowledge, installing a plugin dedicated to the schema is the best choice.
Some Frequently Asked Questions
What is schema?
It is a group of tags that you can add to your site to tell search engines (like Google, Microsoft, Yahoo, and Yandex) and other entities what your content is about. Schema makes it easier for search engines to understand the context and structure of your content. This markup style is maintained at schema.org.
Why is Schema important?
Schema can boost your SEO, help searchers understand your content better, increase organic Click Through Rate and give you a chance to show up in Google’s Knowledge Graph.
How to improve the SEO of my website?
You can get a reliable hosting provider, get an SSL certificate, make your website visible for Search Engines, install an SEO plugin, research keywords and optimize images. You can find more ways to improve your SEO rating here.